Hierarchical Transitionとは
Material Designの特徴でもある階層構造(Elevation)を意識した遷移方法で、 選択したオブジェクトが遷移元である低い階層から遷移先の高い階層へ移動することで、 現実の物質と同じ動きをすると同時に、画面の要素(タイトルの文字等)が次の画面に引き継がれることで より自然な操作体験を得ることが出来ます。
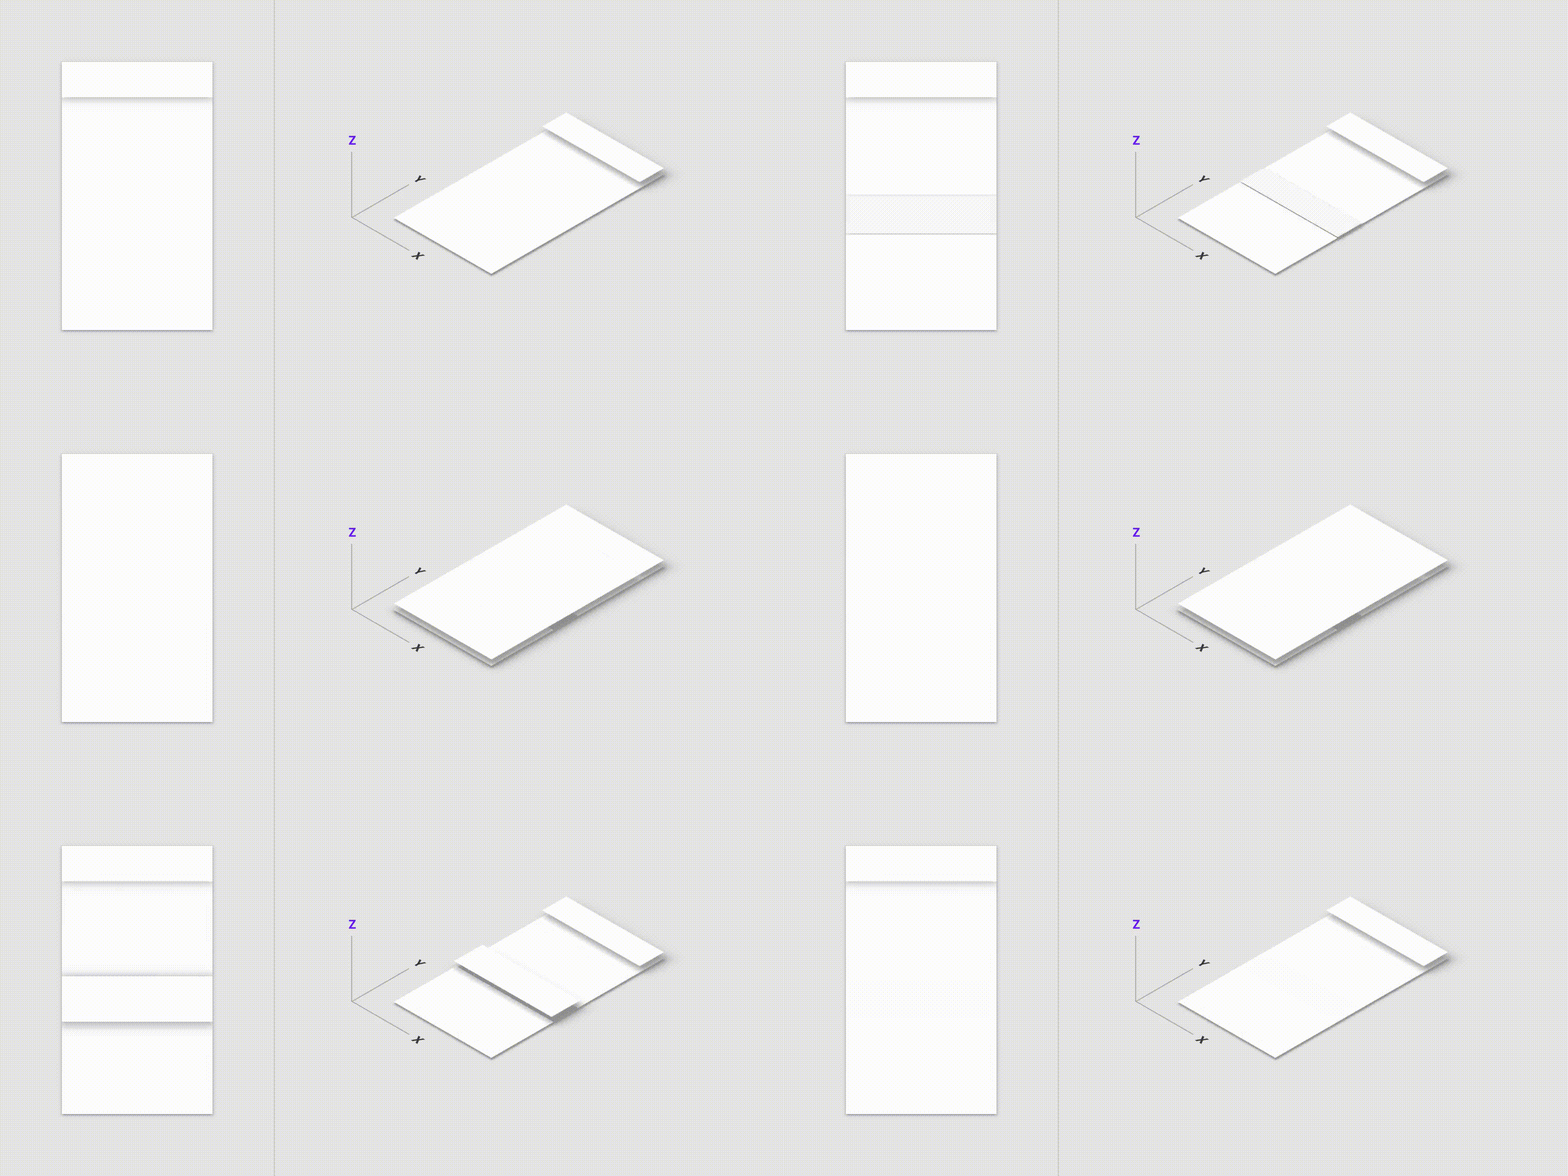
階層構造を詳しく見るとこのようになっています。
- 横から見た階層構造
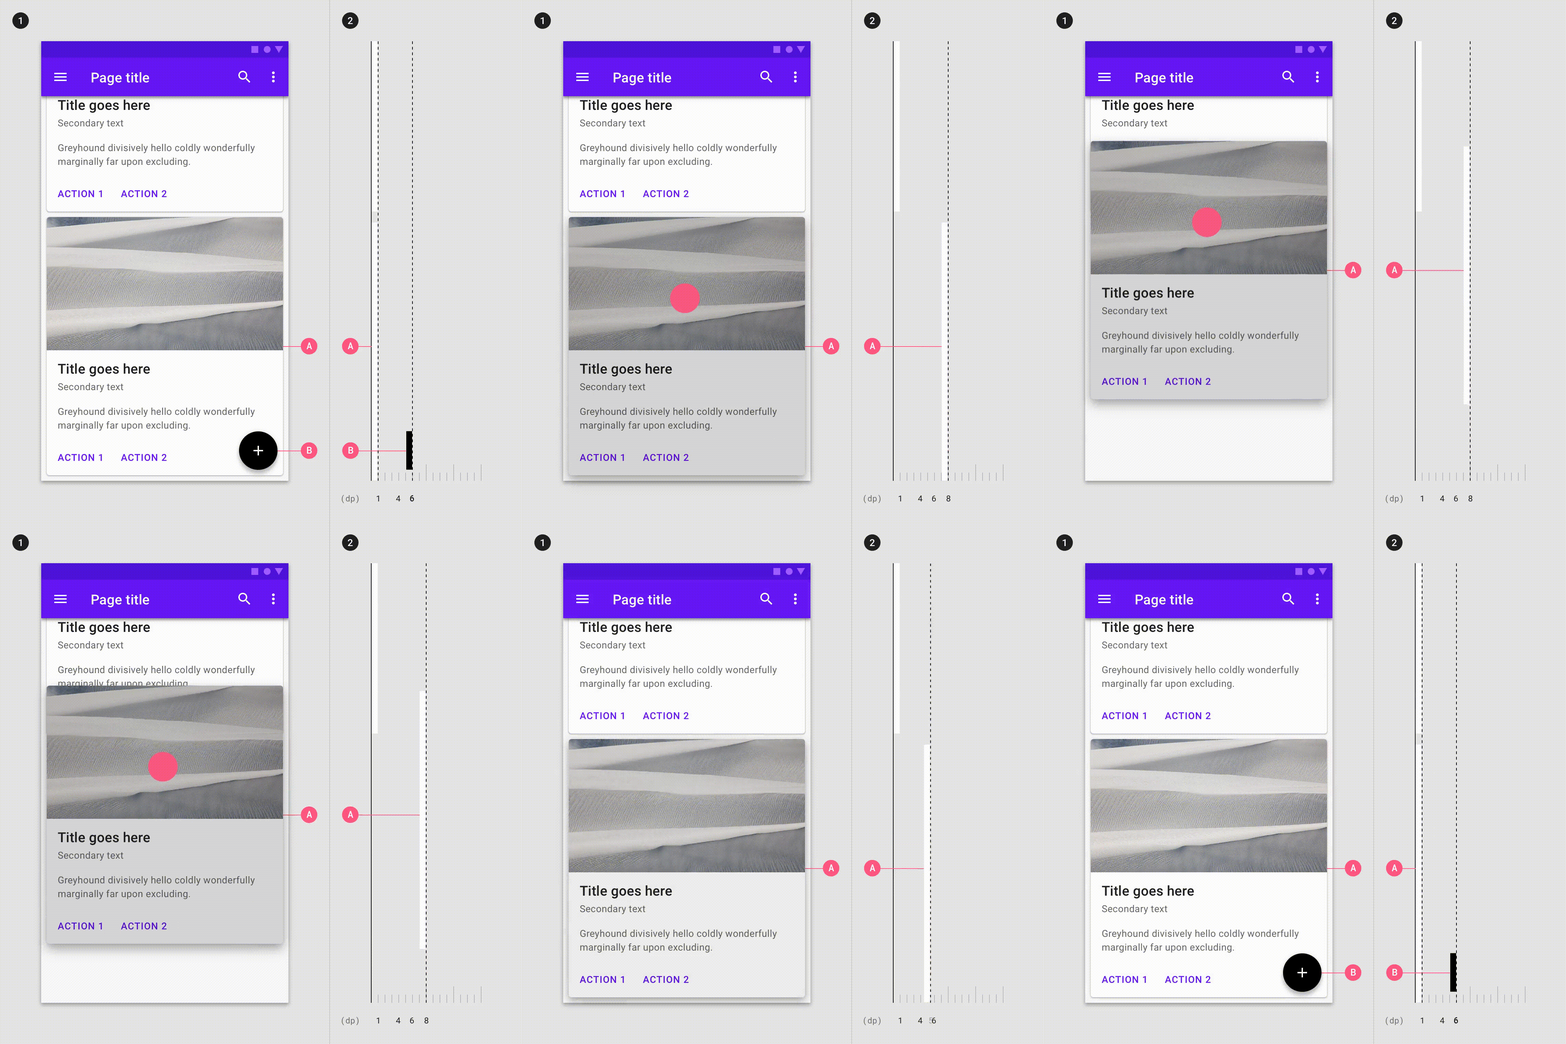
一覧画面のリストでは1dpの高さにオブジェクトが並んでいますが、オブジェクトを選択すると8dpの高さに移動して画面の手前に表示されます。 この時、遷移先である詳細画面は6dpの高さに存在しているAppBarよりも上に来ることで現実の物理法則に則った自然なUIになります。
この考え方は、2014年のMaterial Designの発表時から提唱されており、 Androidアプリでは広く取り入れられるようになってきました。
実装
実装するもの
今回はFlutterでこの画面を実装したいと思います。

一覧画面のリストからオブジェクトを選択して詳細画面に遷移する過程で先程示した図のように階層を上げます。 遷移先から遷移元に戻る動作はスワイプアップまたはスワイプダウンで戻れるようにします。
実装に依りますが、通常の画面遷移はiOSであれば横から上に重なる遷移、Androidであればフェードインして上に積み上がるような遷移をします。
マテリアルデザインの考え方では、遷移した物質は戻る際に元の位置に戻る動きをするのでiOS標準にあるような横スワイプで戻る動きは不自然になります。
そのため、このデザインの場合は縦方向のスワイプによって戻る動作を実現してあげるのが自然な動作になると思います。
みなさんが良く知っているアプリだとTwitterの写真詳細画面の動きがとても近いです。Twitterの場合も写真をタッチすると前面に写真の階層が遷移して、画面一番手前の階層に拡大されます。また、上下に拡大しながら手前に遷移する動作なので横スワイプでは戻らずに縦方向のスワイプのみで元の階層に戻っていきます。Twitterが触っていて違和感なく心地良く使えるアプリなのも、こういった考えがきちんと取り入れられているからに思えます。(iOSのリストから詳細画面の遷移に関してはOS標準の横から重ねて遷移する動作になっています)
実装方法
画面は2つ用意します。
- main.dart (MainPage)
- リスト一覧画面
- detial.dart (DetailPage)
- 詳細画面
Hero transition
Transitionの説明では小難しそうな事を書きましたが、Flutter階層の遷移を実現するのはとても簡単です。 HeroというTransitionを助けてくれるクラスが既に存在していますのでこれを使います。今回階層構造に関してはElevationの値を明示的にセットはしていませんが、AppBarよりも手前に来る動きになるため、擬似的に階層が上がっているように見えます。
まずはAndroidでいうSharedElementTransitions
の動きを解説します。
SharedElementTransitionsを簡単に言うと、先程説明した連続的な動作を表現するために画面間で共通のオブジェクトを繋げるアニメーションです。
このSharedElementの事をFlutterではHero と呼びます。Heroに関しては他に解説されているサイトがたくさんあるので、簡単に説明します。 使い方は簡単で、画面間共有したいWidgetをHeroで囲ってあげるだけで大丈夫です。 その際に、一意となるタグをつけてあげます。 このタグは遷移先の画面にも渡す必要があります。
main.dartHero(
  tag: 'list$index',
  child: Widget(),
)
main.dartNavigator.of(context).push(
  MaterialPageRoute(
    builder: (BuildContext context) {
      return DetailPage(title: list[index], tag: 'list$index');
    },
  ),
);
遷移先の画面でも同じようにWidgetを囲むだけで、後は勝手にFlutterが良い感じの動きをしてくれます。
detail.dartHero(
  tag: widget.tag,
  child: Widget(),
)
もの凄く簡単です。
Androidはリストからの遷移だとRecyclerViewのAdapterからKeyの情報を渡す必要があるので、難しくはないのですが面倒な事が多いです。Flutterでは全てがWidgetになっているためKeyの受け渡しがAndroidと比べると楽でした。これはFlutterのメリットの1つだと思います。
Vertical Swipe
詳細画面に遷移してから前の画面に戻る動きを実現します。
FlutterでDragの動きを実現するには、GestureDetectorを使って画面タッチの動きをフックして、それに合わせて対象のオブジェクトを動かします。
動かしたいWidgetはAnimatedContainerで囲う必要があります。
GestureDetector(
  onVerticalDragStart: (DragStartDetails details){},
  onVerticalDragUpdate: (DragUpdateDetails details){},
  onVerticalDragEnd: (DragEndDetails details){},
  child: AnimatedContainer(
      duration: Duration(milliseconds: containerReverseDuration),
      transform: containerVerticalTransform,
      child: Widget(),
  )
)
画面に指が触れた段階で onVerticalDragStartが呼ばれ、指が触れている間は onVerticalDragUpdateが呼ばれ続け、指を離した時に onVerticalDragUpdateが呼ばれます。
ここはいつも通り、DragStartのタッチ位置を持っておいて、DragUpdateでViewの操作、DragEndで終了処理をすれば良いです。
この辺はAndoridやiOSのアプリを作ったことがある方ならすんなり理解出来ると思います。
Opacity
以上の手順でコードを書いていけば、このような遷移アニメーションは実現する事が出来ます。
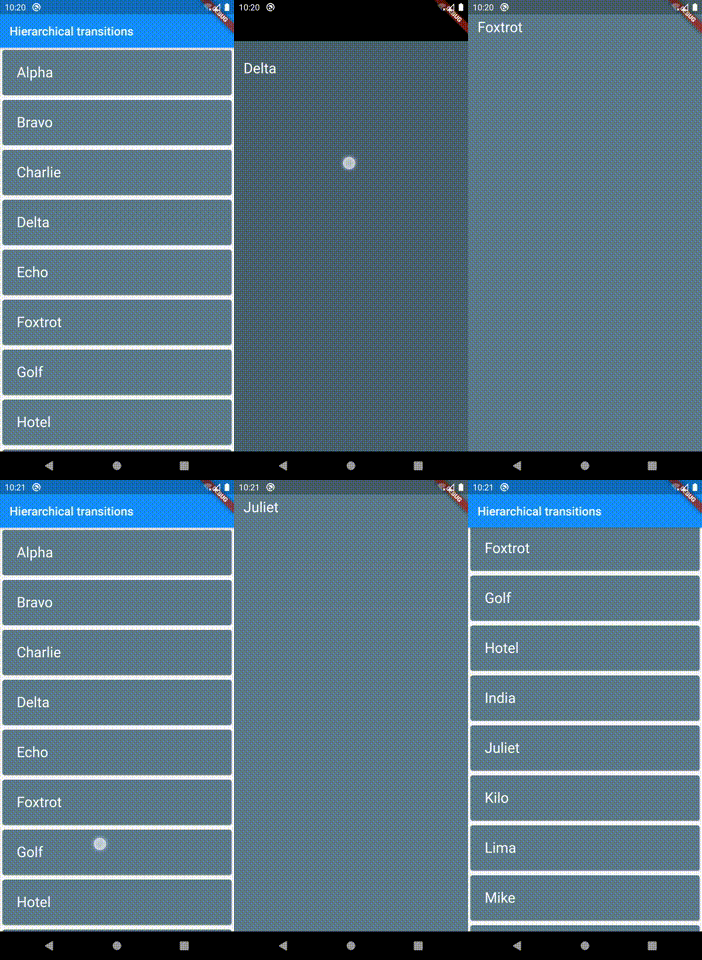
しかし、見ての通りこれだとスワイプした時に詳細画面の背景(黒)が見えているだけで、あまり美しくありません。そこで、詳細画面の背景を透過することでスワイプした際に遷移元のリスト一覧画面を見せるようにします。
注意としては、詳細画面の透過は詳細画面側の設定ではなく、遷移元からの呼び出し時に行います。
main.dartconst int TRANSITION_DURATION = 800;

Navigator.of(context).push(
  PageRouteBuilder<DetailPage>(
    opaque: false,
    pageBuilder: (BuildContext context, Animation<double> animation,
                  Animation<double> secondaryAnimation) {
      return FadeTransition(
        opacity: animation,
        child: DetailPage(title: list[index], tag: 'list$index'),
      );
    },
    transitionDuration: const Duration(milliseconds: TRANSITION_DURATION),
  ),
);
ポイントはPageRouteBuilderに設定する opaque: falseの行です。これを設定することで、遷移先の詳細画面の背景が透明になります。
detail.dartContainer(
  color: Colors.black.withOpacity(containerBackgroundOpacity),
  child: GestureDetector(
    onVerticalDragStart: _onVerticalDragStart,
    onVerticalDragUpdate: _onVerticalDragUpdate,
    onVerticalDragEnd: _onVerticalDragEnd,
    child: AnimatedContainer(
      duration: Duration(milliseconds: containerReverseDuration),
      transform: containerVerticalTransform,
      child: Hero(
        tag: widget.tag,
        child: Material(
          color: Colors.blueGrey,
          child: Padding(
            padding: const EdgeInsets.fromLTRB(16, 32, 16, 0),
            child: Text(
              widget.title,
              style: const TextStyle(fontSize: 24.0, color: Colors.white),
            ),
          ),
        ),
      ),
    ),
  ),
);

const double CONTAINER_MIN_OPACITY = 0.6;

double get containerBackgroundOpacity {
  return max(
      1.0 - currentDragPosition.distance * 0.003, CONTAINER_MIN_OPACITY);
}
詳細画面は、color: Colors.black.withOpacity() で背景の透明度を設定しています。
既に画面自体の背景は透明になっていますので、Widgetの移動量に応じてalphaの値を変化させます。
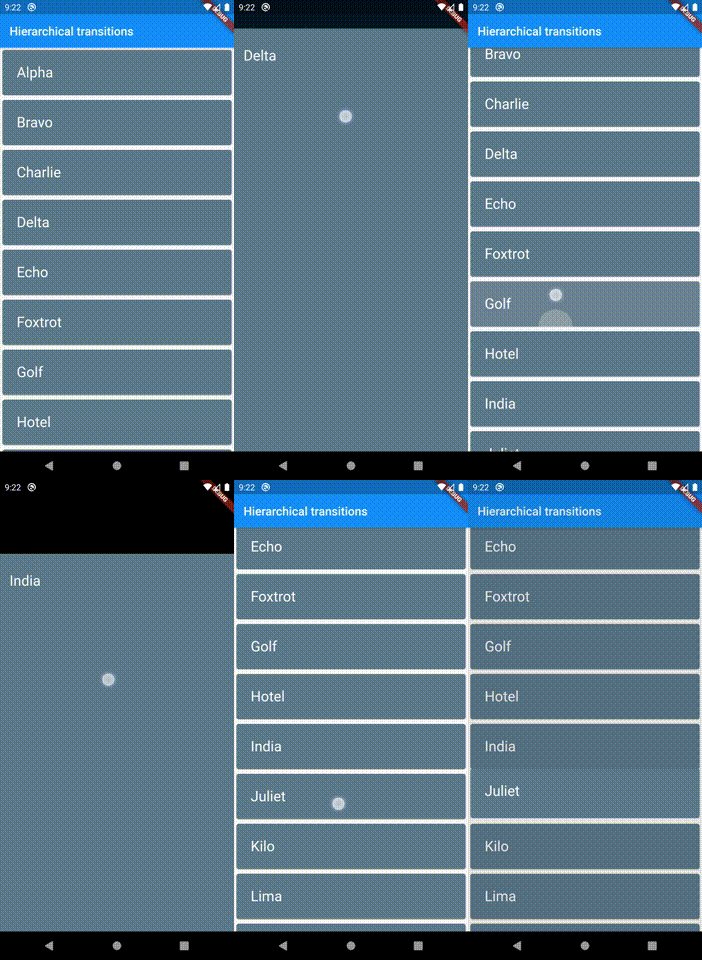
これで、Hierarchical transitionsのような画面をFlutterで実装する事が出来ました。
ListViewと組み合わせる
ここまででHierarchical transitionsは完成しているのですが、最初に紹介した完成版を実現するにはさらにListViewと組み合わせる必要があります。

ListViewが入ると既存のGestureDetectorと干渉してしまい、縦のDrag操作を読み取る事が出来ないため代わりにListenerを使います。基本的な使い方はGestureDetectorと同じです。
この画面はリストがスクロールされていない状態で下方向にスワイプまたは、リストを完全にスクロールし終えた状態で上方向にスクロールすると前の画面に戻ります。これを実現するにはListViewのスクロール位置を把握する必要があるため ScrollControllerを使ってListViewのスクロール位置をとります。
final ScrollController _scrollController = ScrollController();

child: ListView(
  controller: _scrollController,
  children: <Widget>[]
)
あとは、ScrollControllerを使って、ドラッグ時のスクロール方向とスクロール位置から
リストのスクロールが下方向かつスクロール量が最大の時または、スクロールが上方向かつスクロール量が0の時 のドモルガンを使って早期returnしてあげます。
void _onPointerMove(PointerMoveEvent event) {
  final ScrollDirection direction =
      _scrollController.position.userScrollDirection;
  if ((direction != ScrollDirection.reverse ||
      _scrollController.position.maxScrollExtent >
          _scrollController.position.pixels) &&
      (direction != ScrollDirection.forward ||
          _scrollController.offset > 0)) {
    return;
  }

  setState(() {
    currentDragPosition = Offset(
      0,
      event.position.dy - beginningDragPosition.dy,
    );
  });
}
これだけでも動作はするのですが、UXを上げるためにもう1つやっておきたいことがあります。
現在の実装だとListViewのスクロールとAnimatedContainerのスクロールがconflictしてしまっているので、例えばリストの上限から下方向にスワイプしてReverse transitionのアニメーション状態にした後、逆方向にドラッグするとリストのスクロールが反応してしまい、思ったような動作にはなりません。リストの下限でも逆方向に同じ動作になります。
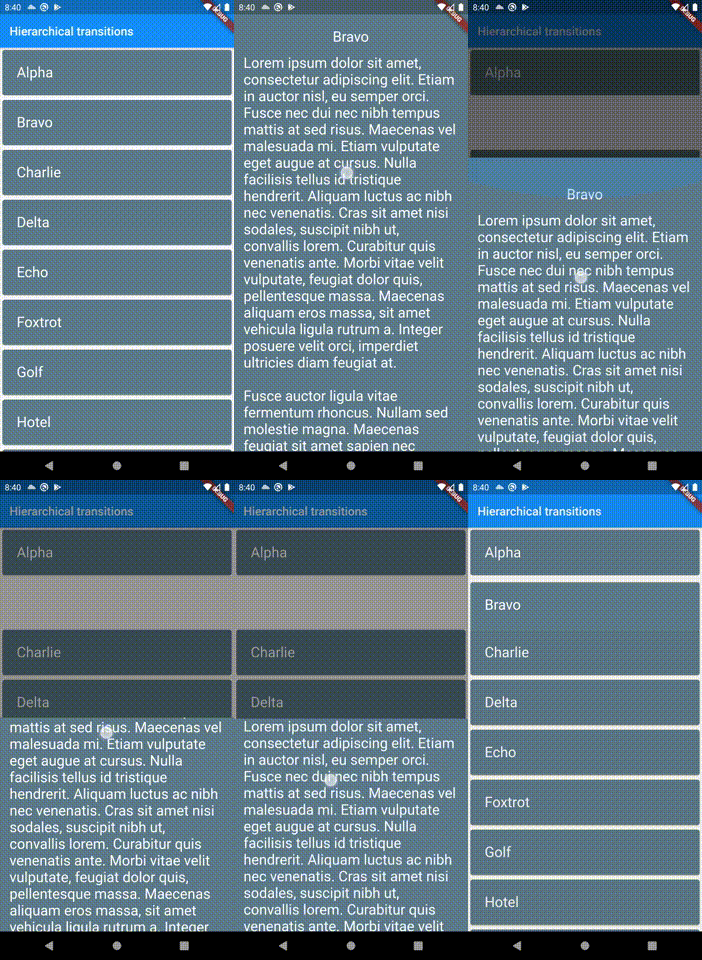
これを解決するために、ListViewのphysicsプロパティを制御します。
スクロールの状態に応じてNeverScrollableScrollPhysicsというスクロールをさせない制御を切り替えることでドラッグ中に閾値を超えて、Reverse transitionのアニメーション状態になった段階でスクロールをロックすることが出来ます。そうすることで、逆方向にドラッグしてもリストがスクロールせずにドラッグを続ける事が出来ます。
bool isDragging = false;

ListView(
  physics: _scrollPhysics,
)

ScrollPhysics get _scrollPhysics {
  if (isDragging) {
    return const NeverScrollableScrollPhysics();
  } else {
    return null;
  }
}

void _onPointerMove(PointerMoveEvent event) {
  setState(() {
    isDragging = true;
  });
}

void _onPointerUpEvent(PointerUpEvent event) {
  setState(() {
    isDragging = false;
  });
}
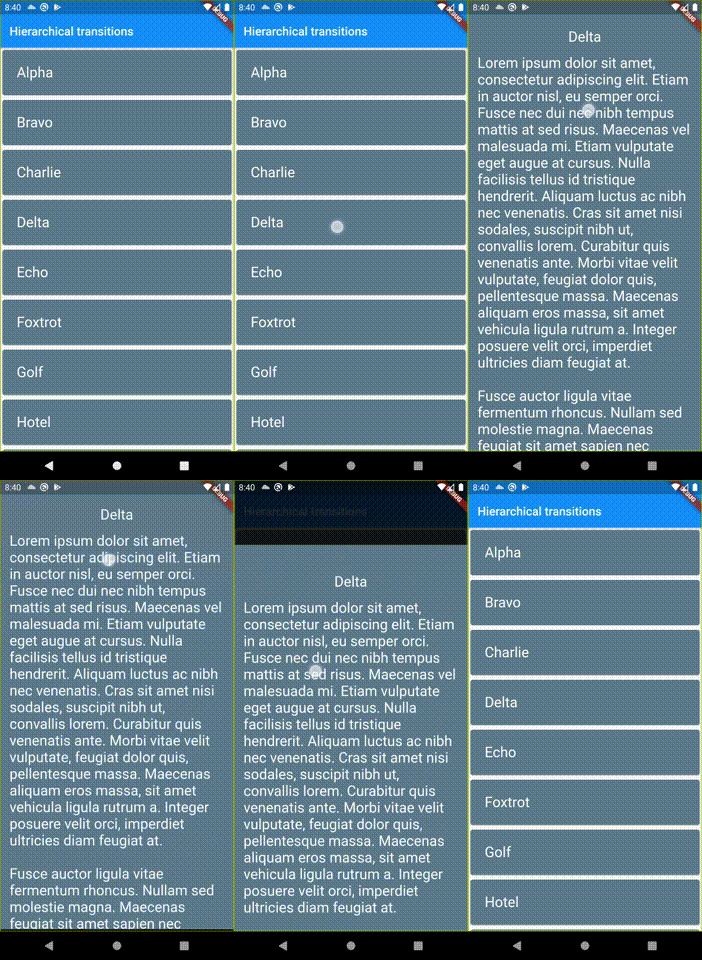
詳細画面のコード全体はこのようになっています。
detail.dartconst double VERTICAL_SWIPE_THRESHOLD = 200;
const int CONTAINER_REVERSE_DURATION = 200;
const double CONTAINER_MIN_OPACITY = 0.3;

class DetailPage extends StatefulWidget {
  const DetailPage({Key key, this.title, this.tag}) : super(key: key);

  final String title;
  final String tag;

  @override
  State<StatefulWidget> createState() => _DetailState();
}

class _DetailState extends State<DetailPage> {
  final ScrollController _scrollController = ScrollController();

  Offset beginningDragPosition = Offset.zero;
  Offset currentDragPosition = Offset.zero;
  int containerReverseDuration = 0;
  bool isDragging = false;

  @override
  Widget build(BuildContext context) {
    return Container(
      color: Colors.black.withOpacity(containerBackgroundOpacity),
      child: Listener(
        onPointerDown: _onPointerDown,
        onPointerMove: _onPointerMove,
        onPointerUp: _onPointerUpEvent,
        child: AnimatedContainer(
          duration: Duration(milliseconds: containerReverseDuration),
          transform: containerVerticalTransform,
          child: Hero(
            tag: widget.tag,
            child: Material(
              color: Colors.blueGrey,
              child: ListView(
                physics: _scrollPhysics,
                controller: _scrollController,
                children: <Widget>[
                  const SizedBox(height: 24),
                  Text(
                    widget.title,
                    style: const TextStyle(fontSize: 24.0, color: Colors.white),
                    textAlign: TextAlign.center,
                  ),
                  const SizedBox(height: 16),
                  Padding(
                    padding: const EdgeInsets.fromLTRB(16, 0, 16, 24),
                    child: Text(
                      DUMMY_TEXT,
                      style:
                      const TextStyle(fontSize: 24.0, color: Colors.white),
                    ),
                  )
                ],
              ),
            ),
          ),
        ),
      ),
    );
  }

  double get containerBackgroundOpacity {
    return max(
        1.0 - currentDragPosition.distance * 0.0015, CONTAINER_MIN_OPACITY);
  }

  Matrix4 get containerVerticalTransform {
    final Matrix4 translationTransform = Matrix4.translationValues(
      0,
      currentDragPosition.dy,
      0.0,
    );

    return translationTransform;
  }

  ScrollPhysics get _scrollPhysics {
    if (isDragging) {
      return const NeverScrollableScrollPhysics();
    } else {
      return null;
    }
  }

  void _onPointerDown(PointerDownEvent event) {
    setState(() {
      containerReverseDuration = 0;
    });
    beginningDragPosition = event.position;
  }

  void _onPointerMove(PointerMoveEvent event) {
    final ScrollDirection direction =
        _scrollController.position.userScrollDirection;
    if ((direction != ScrollDirection.reverse ||
        _scrollController.position.maxScrollExtent >
            _scrollController.position.pixels) &&
        (direction != ScrollDirection.forward ||
            _scrollController.offset > 0)) {
      return;
    }

    setState(() {
      currentDragPosition = Offset(
        0,
        event.position.dy - beginningDragPosition.dy,
      );
      isDragging = true;
    });
  }

  void _onPointerUpEvent(PointerUpEvent event) {
    if (currentDragPosition.distance < VERTICAL_SWIPE_THRESHOLD) {
      setState(() {
        currentDragPosition = Offset.zero;
        containerReverseDuration = CONTAINER_REVERSE_DURATION;
      });
    } else {
      Navigator.of(context).pop();
    }
    isDragging = false;
  }
}
以上のコードで、Hierarchical transitions + αの動きがFlutterで実現出来ました。 Flutterは、こういった画面のプロトタイプを作るのはとても簡単に出来るので、デザイナーがUXを実際に作ってみるのも以前と比べるとハードルが下がっているように感じます。Flutterの強みはこういうところにあるのかなと感じました。
今回のサンプルリポジトリはこちらになります。