今回はM5 StackのCamera X/F を使って、カメラの画像を取得するAPIサーバーを作ります。
M5 Stack Timer Camera X/Fとは
M5 Stackはここ数年人気が出ているマイコンモジュールでESP32をベースに作られているため、 最初からWi-FiやBluetoothなどの無線通信が使えたりArduino IDEも対応しているため、Arduinoなどのマイコン類を触ったことがあれば比較的簡単にプログラムが動かせます。
M5 Stackにも複数種類があってCOREやSTICKなどがあり、その中の1つとしてカメラがあります。
カメラにも2つ種類があって、Xは通常のレンズ、Fは広角のレンズになっています。
Amazonには取り扱いがないようで、Switch Science
から買えるみたいです。
ちなみに私は秋葉原で買いました。(店はどこか忘れました)
事前準備
Arduino IDE
新品の状態は予めブラウザで動作するプログラムがインストールされているので、カメラの画像を表示するだけならSoft APモードで接続してプログラミングせずに使うこともできます。
ただ今回はM5 Stack Timer Cameraをサーバー化して画像を取得したいのでArduino IDEを使って準備します。
Arduino IDEをダウンロードしてインストールします。
最近バージョン2.xがでて今までのレトロな雰囲気だった1.x系から見た目も使い勝手もいい感じになったのですが、残念ながら動きません。
他で持っているマイコンも2.x系だと動かないので、まだ1.xを使うことになりそうです。
アーカイブでも新しすぎるものは動かなかったりするのですが、Timer Cameraに関しては 1.8.19 で動作しました。
さらに古いバージョンのアーカイブはこちらにあります。
M5 Camera Plugin
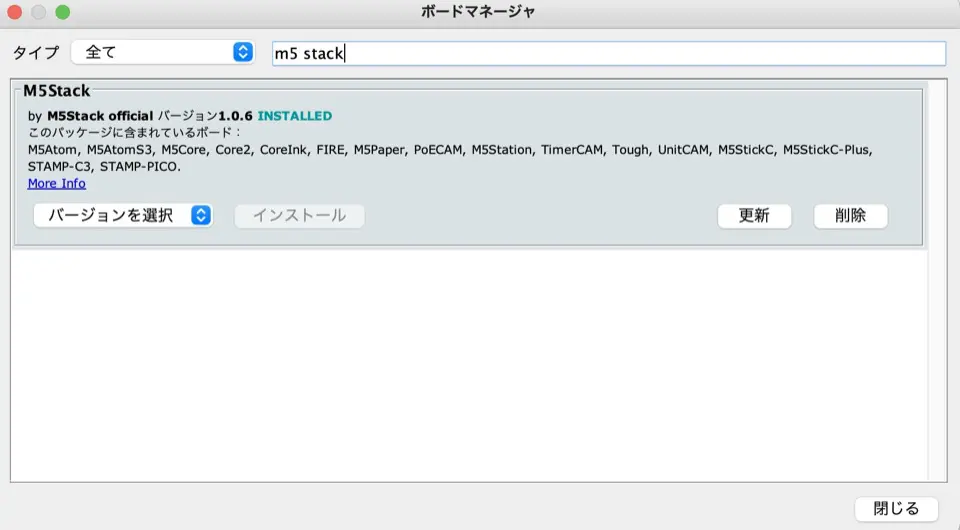
ツール > ボード > ボードマネージャー > m5 stack で検索
バージョンは新しいのだと動かなかったのでとりあえず 1.0.6 を選びました。
インストールしたら
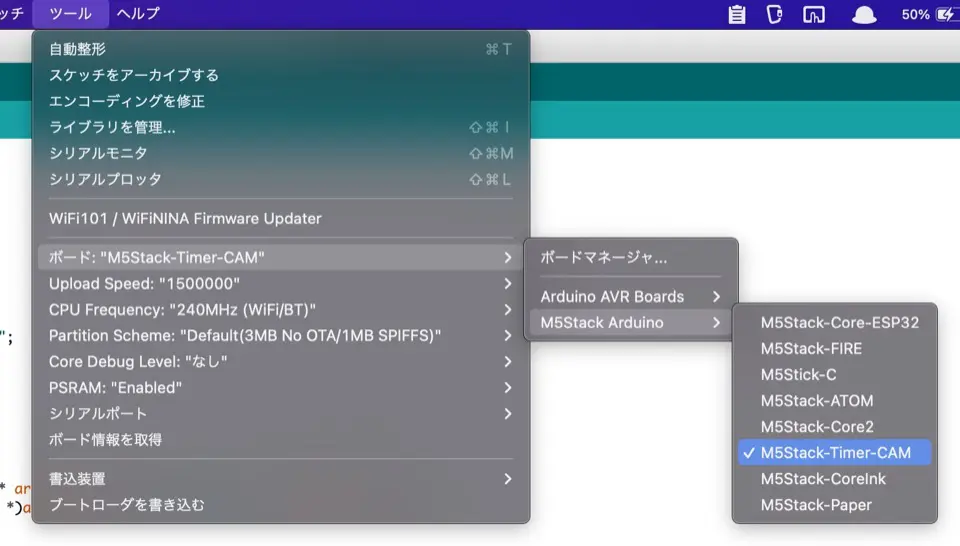
ツール > ボード > M5Stack Arduino > M5Stack-Timer-CAM を選択します。
次に転送速度を変更します。
これを変更しないとTimer Camera側への書き込みがうまくいきませんでした。
環境によって異なると思うので適宜変更してみてください。
ツール > Upload Speed > 1500000
コード
環境構築ができたのでコードを書いていきます。
バッテリーの無効化
なんとTimer Cameraはバッテリーが内蔵されています。
そのため、数時間なら電源に接続せずに写真を送り続ける事が可能です。
ただ今回はバッテリーで動作させない&デバッグ中にケーブルに繋いでいて、開発終了時にしばらく電源が切れないのが煩わしかったのでこの機能はoffにしました。
#include "battery.h"

void setup() {
  bat_init();
  bat_disable_output();
}

void loop() {
}
WiFi接続
Timer CameraをWebサーバー化するにはまずはWiFiに接続します。
SoftAPモードでも動くは動くのですが、自宅のWiFiアクセスポイントに繋いだほうが動作が安定します。
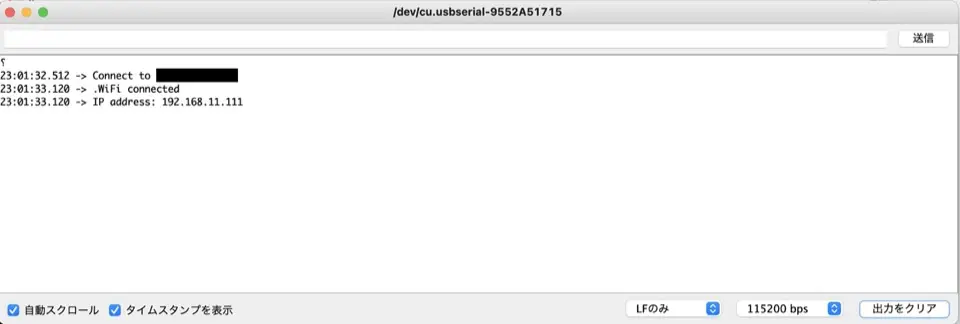
WiFiに接続できたらIPアドレスをシリアルで表示します。
#include "WiFi.h"

// WiFi Info
const char* ssid = "your ssid";
const char* password = "your password";

void init_wifi() {
  Serial.printf("Connect to %s, \r\n", ssid);
  WiFi.begin(ssid, password);

  while (WiFi.status() != WL_CONNECTED) {
    delay(500);
    Serial.print(".");
  }
  Serial.println("WiFi connected");

  IPAddress IP = WiFi.localIP();
  Serial.print("IP address: ");
  Serial.println(IP);
}


void setup() {
  // setup serial
  Serial.begin(115200);
  Serial.setDebugOutput(true);
  Serial.println();

  init_wifi();
}

void loop() {

}
API Server
先程のコードでWiFiに接続できたら esp_http_server を使ってAPI Serverをたてます。
とりあえず /healthCheck のエンドポイントを作りました。
パスごとにhandlerを追加していくイメージです。
#include "WiFi.h"
#include "esp_http_server.h"

// WiFi Info
const char* ssid = "your ssid";
const char* password = "your password";

esp_err_t get_health_check_handler(httpd_req_t *req) {
  const char resp[] = "Alive";
  httpd_resp_send(req, resp, strlen(resp));
  return ESP_OK;
}

httpd_uri_t uri_get_health_check = {
  .uri      = "/healthCheck",
  .method   = HTTP_GET,
  .handler  = get_health_check_handler,
  .user_ctx = NULL
};

// If server failed to start, return NULL
httpd_handle_t start_webserver(void) {
  httpd_config_t config = HTTPD_DEFAULT_CONFIG();

  httpd_handle_t server = NULL;


  if (httpd_start(&server, &config) == ESP_OK) {
    httpd_register_uri_handler(server, &uri_get_health_check);
  }

  return server;
}

void stop_webserver(httpd_handle_t server) {
  if (server) {
    httpd_stop(server);
  }
}

void init_wifi() {
  Serial.printf("Connect to %s, \r\n", ssid);
  WiFi.begin(ssid, password);

  while (WiFi.status() != WL_CONNECTED) {
    delay(500);
    Serial.print(".");
  }
  Serial.println("WiFi connected");

  IPAddress IP = WiFi.localIP();
  Serial.print("IP address: ");
  Serial.println(IP);
}

void setup() {
  // setup serial
  Serial.begin(115200);
  Serial.setDebugOutput(true);
  Serial.println();

  init_wifi();
  start_webserver();
}

void loop() {

}
curlするとAliveが返ってきます。
% curl 192.168.11.111/healthCheck
Alive
カメラ画像取得
とりあえず画像を取得するだけのコードです。
#include "esp_camera.h"
#include "camera_pins.h"


// Camera settings
bool init_camera(void) {
  camera_config_t config;
  config.ledc_channel = LEDC_CHANNEL_0;
  config.ledc_timer   = LEDC_TIMER_0;
  config.pin_d0       = Y2_GPIO_NUM;
  config.pin_d1       = Y3_GPIO_NUM;
  config.pin_d2       = Y4_GPIO_NUM;
  config.pin_d3       = Y5_GPIO_NUM;
  config.pin_d4       = Y6_GPIO_NUM;
  config.pin_d5       = Y7_GPIO_NUM;
  config.pin_d6       = Y8_GPIO_NUM;
  config.pin_d7       = Y9_GPIO_NUM;
  config.pin_xclk     = XCLK_GPIO_NUM;
  config.pin_pclk     = PCLK_GPIO_NUM;
  config.pin_vsync    = VSYNC_GPIO_NUM;
  config.pin_href     = HREF_GPIO_NUM;
  config.pin_sscb_sda = SIOD_GPIO_NUM;
  config.pin_sscb_scl = SIOC_GPIO_NUM;
  config.pin_pwdn     = PWDN_GPIO_NUM;
  config.pin_reset    = RESET_GPIO_NUM;
  config.xclk_freq_hz = 20000000;
  config.pixel_format = PIXFORMAT_JPEG;
  config.frame_size   = FRAMESIZE_SXGA;
  config.jpeg_quality = 10;
  config.fb_count     = 2;

  esp_err_t err = esp_camera_init(&config);
  if (err != ESP_OK) {
    Serial.printf("Camera init failed with error 0x%x", err);
    return false;
  }

  sensor_t *s = esp_camera_sensor_get();

  s->set_vflip(s, 1);
  s->set_brightness(s, 0);
  s->set_saturation(s, 0);

  return true;
}


void setup() {
  // setup serial
  Serial.begin(115200);
  Serial.setDebugOutput(true);
  Serial.println();

  init_camera();

  camera_fb_t * fb = NULL;
  esp_err_t res = ESP_OK;
  size_t fb_len = 0;
  int64_t fr_start = esp_timer_get_time();

  fb = esp_camera_fb_get();
  if (!fb) {
    Serial.printf("Camera capture failed");
  }
}

void loop() {

}
画像取得にはポイントがあってこの部分で画像の解像度を指定しています。
config.frame_size   = FRAMESIZE_SXGA;
config.jpeg_quality = 10;
- 解像度一覧
| name | resolution |
|---|---|
| FRAMESIZE__VGA | 640x480 |
| FRAMESIZE_SVGA | 800x600 |
| FRAMESIZE_XGA | 1024x768 |
| FRAMESIZE_SXGA | 1280x1024 |
| FRAMESIZE_UXGA | 1600x1200 |
| FRAMESIZE_QXGA | 2048x1536 |
jpeg_qualityに関しては小さい方が解像度があがります。
画像を返すAPI Server
今までのコードを組み合わせて画像を返すエンドポイント /photoを追加しました。
#include "battery.h"

#include "esp_camera.h"
#include "camera_pins.h"

#include "WiFi.h"
#include "esp_http_server.h"

// WiFi Info
const char* ssid = "your ssid";
const char* password = "your password";

typedef struct {
  httpd_req_t *req;
  size_t len;
} jpg_chunking_t;

static size_t jpg_encode_stream(void * arg, size_t index, const void* data, size_t len) {
  jpg_chunking_t *j = (jpg_chunking_t *)arg;
  if (!index) {
    j->len = 0;
  }
  if (httpd_resp_send_chunk(j->req, (const char *)data, len) != ESP_OK) {
    return 0;
  }
  j->len += len;
  return len;
}

esp_err_t get_health_check_handler(httpd_req_t *req) {
  const char resp[] = "Alive";
  httpd_resp_send(req, resp, strlen(resp));
  return ESP_OK;
}

esp_err_t get_photo_handler(httpd_req_t *req) {
  camera_fb_t * fb = NULL;
  esp_err_t res = ESP_OK;
  size_t fb_len = 0;
  int64_t fr_start = esp_timer_get_time();

  fb = esp_camera_fb_get();
  if (!fb) {
    ESP_LOGE(TAG, "Camera capture failed");
    httpd_resp_send_500(req);
    return ESP_FAIL;
  }
  res = httpd_resp_set_type(req, "image/jpeg");
  if (res == ESP_OK) {
    res = httpd_resp_set_hdr(req, "Content-Disposition", "inline; filename=capture.jpg");
  }

  if (res == ESP_OK) {
    if (fb->format == PIXFORMAT_JPEG) {
      fb_len = fb->len;
      res = httpd_resp_send(req, (const char *)fb->buf, fb->len);
    } else {
      jpg_chunking_t jchunk = {req, 0};
      res = frame2jpg_cb(fb, 1, jpg_encode_stream, &jchunk) ? ESP_OK : ESP_FAIL;
      httpd_resp_send_chunk(req, NULL, 0);
      fb_len = jchunk.len;
    }
  }
  esp_camera_fb_return(fb);
  int64_t fr_end = esp_timer_get_time();
  ESP_LOGI(TAG, "JPG: %uKB %ums", (uint32_t)(fb_len / 1024), (uint32_t)((fr_end - fr_start) / 1000));
  return res;
}


httpd_uri_t uri_get_health_check = {
  .uri      = "/healthCheck",
  .method   = HTTP_GET,
  .handler  = get_health_check_handler,
  .user_ctx = NULL
};

httpd_uri_t uri_get_photo_check = {
  .uri      = "/photo",
  .method   = HTTP_GET,
  .handler  = get_photo_handler,
  .user_ctx = NULL
};


// If server failed to start, return NULL
httpd_handle_t start_webserver(void) {
  httpd_config_t config = HTTPD_DEFAULT_CONFIG();

  httpd_handle_t server = NULL;


  if (httpd_start(&server, &config) == ESP_OK) {
    httpd_register_uri_handler(server, &uri_get_health_check);
    httpd_register_uri_handler(server, &uri_get_photo_check);
  }

  return server;
}

void stop_webserver(httpd_handle_t server) {
  if (server) {
    httpd_stop(server);
  }
}

void init_wifi() {
  Serial.printf("Connect to %s, \r\n", ssid);
  WiFi.begin(ssid, password);

  while (WiFi.status() != WL_CONNECTED) {
    delay(500);
    Serial.print(".");
  }
  Serial.println("WiFi connected");

  IPAddress IP = WiFi.localIP();
  Serial.print("IP address: ");
  Serial.println(IP);
}

// Camera settings
bool init_camera(void) {
  camera_config_t config;
  config.ledc_channel = LEDC_CHANNEL_0;
  config.ledc_timer   = LEDC_TIMER_0;
  config.pin_d0       = Y2_GPIO_NUM;
  config.pin_d1       = Y3_GPIO_NUM;
  config.pin_d2       = Y4_GPIO_NUM;
  config.pin_d3       = Y5_GPIO_NUM;
  config.pin_d4       = Y6_GPIO_NUM;
  config.pin_d5       = Y7_GPIO_NUM;
  config.pin_d6       = Y8_GPIO_NUM;
  config.pin_d7       = Y9_GPIO_NUM;
  config.pin_xclk     = XCLK_GPIO_NUM;
  config.pin_pclk     = PCLK_GPIO_NUM;
  config.pin_vsync    = VSYNC_GPIO_NUM;
  config.pin_href     = HREF_GPIO_NUM;
  config.pin_sscb_sda = SIOD_GPIO_NUM;
  config.pin_sscb_scl = SIOC_GPIO_NUM;
  config.pin_pwdn     = PWDN_GPIO_NUM;
  config.pin_reset    = RESET_GPIO_NUM;
  config.xclk_freq_hz = 20000000;
  config.pixel_format = PIXFORMAT_JPEG;
  config.frame_size   = FRAMESIZE_SXGA;
  config.jpeg_quality = 10;
  config.fb_count     = 2;

  // camera init
  esp_err_t err = esp_camera_init(&config);
  if (err != ESP_OK) {
    Serial.printf("Camera init failed with error 0x%x", err);
    return false;
  }

  sensor_t *s = esp_camera_sensor_get();
  s->set_vflip(s, 1);
  s->set_brightness(s, 0);
  s->set_saturation(s, 0);

  return true;
}


void setup() {
  // setup batetery
  bat_init();
  bat_disable_output();

  // setup serial
  Serial.begin(115200);
  Serial.setDebugOutput(true);
  Serial.println();

  pinMode(2, OUTPUT);
  digitalWrite(2, HIGH);

  init_wifi();
  init_camera();
  start_webserver();
}

void loop() {

}
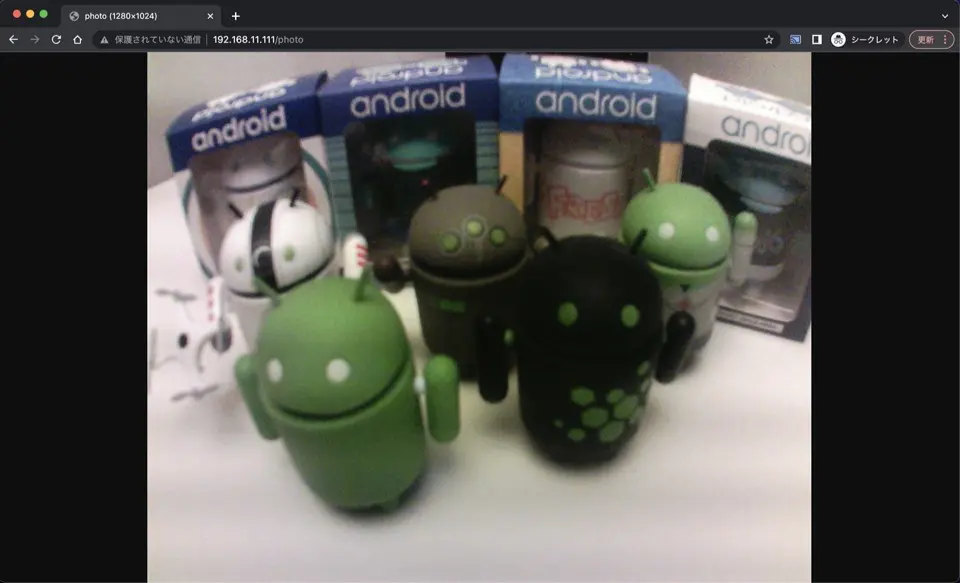
これでブラウザから接続してみましょう。
あまり画質は良くないですがカメラの画像をブラウザから見ることができました。
まとめ
M5StackのTimer Cameraをつかって画像をリアルタイムに返すAPIサーバーを立てました。
バッテリーも無線通信もついて約3000円で買えるのでRaspberryPiやArduino+カメラの構成を作るよりも簡単でお得だと思いました。
このカメラを使ってお家ハックを開発しているので、別の記事に書きたいと思います。