Android12から独自Splashが非推奨になりました。Splashの名前を含む独自クラスがあるとLintで注意されます。
もともとGoogleは起動画面が遅くなるとかでSplash Screen反対派だった気がしますが(雑な記憶なので、ソースなし)、昨今はどのアプリにもSplashが表示されることが多くなったためか、Android側に標準のSplashが搭載されることになりました。正確にはAndroid12以降のアプリは強制的にSplash画面が表示されます。
そのため、すでにSplash画面を用意しているアプリはAndroid12以降で独自のSplashとOSによるSplashが2重に表示されてしまうため注意が必要になります。
migration方法は公式にも載っているので、こちらを参考にしてください。
https://developer.android.com/develop/ui/views/launch/splash-screen/migrate
まずは公式で用意されてるSplashを説明すると、以下のように画面中央にアプリアイコンが表示されます。
なにも指定していない場合はアプリのアイコンが表示されますが、Splash用に別のアイコンを指定も可能です。
また、AnimatedVectorDrawableも使えます。GmailのアプリなどはAnimatedVectorDrawableでアニメーションしています。
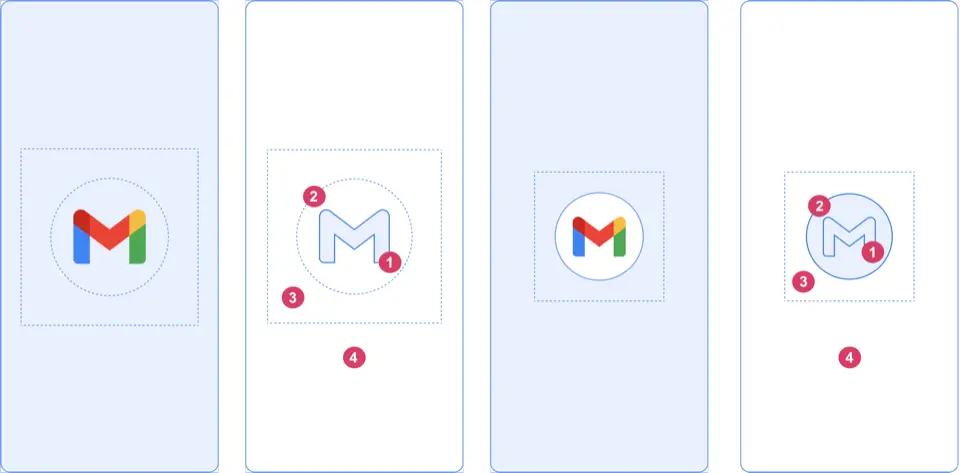
出典: https://developer.android.com/develop/ui/views/launch/splash-screen/migrate
Splash Screen実装方法
利用方法は簡単で、Splash用のStyleを定義してManifestのapplicationか起動activityにセットしてあげるだけです。
dependencies {
    implementation("androidx.core:core-splashscreen:1.0.0")
}
<style name="Theme.App.Starting" parent="Theme.SplashScreen">
   <item name="windowSplashScreenBackground">@color/red</item>
   <item name="windowSplashScreenAnimatedIcon">@drawable/icon</item>
   <item name="windowSplashScreenAnimationDuration">200</item>
   <item name="postSplashScreenTheme">@style/Theme.App</item>
</style>
windowSplashScreenBackground
slpashの背景色windowSplashScreenAnimatedIcon
アイコン or AnimatedVectorDrawablewindowSplashScreenAnimationDuration
AnimatedVectorDrawableを使う場合はそっちの値が優先されるので、この値は使われませんpostSplashScreenTheme
現在のThemeの親がTheme.SplashScreenになっているので、Splash終了後にTheme.AppCompatを継承したThemeに変更します。(適宜それぞれのプロジェクトで使っているThemeに変えてください)
※ この値を設定しないとクラッシュします。
<manifest>
   <application android:theme="@style/Theme.App.Starting">
    <!-- or -->
        <activity android:theme="@style/Theme.App.Starting" />
    </application>
</manifest>
super.onCreate() の前に installSplashScreen() を呼び出します。
class MainActivity : Activity() {

   override fun onCreate(savedInstanceState: Bundle?) {
       val splashScreen = installSplashScreen()

       super.onCreate(savedInstanceState)
       setContentView(R.layout.main_activity)
これらのを指定しない場合は勝手にアプリアイコンが表示されます。
つまり、Splashは特にカスタマイズはできず、アイコン or AnimatedVectorDrawableの表示のみが行えるということになります。
Splashアニメーションをカスタマイズする
強制的に表示される新しいSplash画面では、基本的にアプリのアイコンを中心に表示することのみができました。
これだけでも全く問題はないのですが、以前から作っていたSplash画面はアニメーションを入れて起動後の画面に繋げられるようにしていたため、Splash Screen APIでも同じようなUIが実現できないか試行錯誤してみました。
元々作っていたSplashScreen
SplashActivityから初回起動かどうかの判定などをして、Activity自体にフェードアウトのアニメーションを入れてMainActivityにロゴをTransitionアニメーションで遷移するようにしていました。
Andorid12以降のSplash APIで同じようなSplashを実現するのは難しいと思ったので、素直にアイコンを表示しようと思ったのですが、興味本位で色々弄ってみたら意外とカスタマイズができてしまったので、共有したいと思います。
(ただ推奨されるやり方ではないと思いますので参考にする場合は注意してください)
Splash Screen
まずは、APIとして用意されているSplashScreenViewのレイアウトを知ることが大事です。
SplashScreenViewはviewではなく、windowとして実装されていることがわかります。 レイアウト自体はとてもシンプルで、Viewで作られた背景の上にアイコン画像が重ねられています。
<android.window.SplashScreenView
    xmlns:android="http://schemas.android.com/apk/res/android"
    android:layout_height="match_parent"
    android:layout_width="match_parent"
    android:padding="0dp"
    android:orientation="vertical">
    <ImageView android:id="@+id/splashscreen_icon_view"
          android:layout_height="wrap_content"
          android:layout_width="wrap_content"
          android:layout_gravity="center"
          android:padding="0dp"
          android:background="@null"
          android:contentDescription="@string/splash_screen_view_icon_description"/>
    <View android:id="@+id/splashscreen_branding_view"
          android:layout_height="wrap_content"
          android:layout_width="wrap_content"
          android:layout_gravity="center_horizontal|bottom"
          android:layout_marginBottom="60dp"
          android:padding="0dp"
          android:background="@null"
          android:forceHasOverlappingRendering="false"
          android:contentDescription="@string/splash_screen_view_branding_description"/>
</android.window.SplashScreenView>
上記で設定していた windowSplashScreenBackgroud やwindowSplashScreenAnimatedIcon の値はここにセットされています。
つまり、このViewをうまく弄ってあげれば、多少のカスタマイズが可能になります。
実装
SplashScreenのviewには前述の installSplashScreen から簡単にアクセス可能です。
val splashScreen = installSplashScreen()

// 背景
splashScreenView.view
// アイコン
splashScreenView.iconView
この2つをTranslateAnimationとViewAnimationを駆使していい感じにしていきます。
先に完成図を見せるとこうなります。
デフォルトで表示されてしまうSplashから違和感なく起動後の画面に遷移できていると思います。
せっかくなので、アイコンはAnimatedVectorDrawableを新たに作ってみました。
ツール系アプリでそんなに頻繁に起動するタイプのサービスではないため、アニメーションを優先してDurationは若干長めに取っています。
アプリアイコンを表示するエリアにはサイズ指定があるため、ロゴのテキスト部分は表示できませんでしたが、元々作成していた自作のSplashとほぼ同じようなアニメーションを実装できました。
具体的な実装はこのようになっています。
class SplashActivity : AppCompatActivity() {

    companion object {
        private const val SPLASH_DURATION = 800L
    }

    private lateinit var binding: ActivitySplashBinding

    private val screenHeight by lazy { Resources.getSystem().displayMetrics.heightPixels }

    override fun onCreate(savedInstanceState: Bundle?) {
        val splashScreen = installSplashScreen()
        super.onCreate(savedInstanceState)

        splashScreen.setOnExitAnimationListener { splashScreenView ->
            val height = getRealDisplayHeight()

            // Activity自体の背景色
            window.decorView.setBackgroundColor(resources.getColor(R.color.background, null))

            // アイコンのTranslate Animation
            val centerX = splashScreenView.view.width / 2;
            val centerY = 0
            val endRadius = height * 0.4f
            val clipPath = Path().apply {
                addCircle(centerX.toFloat(), centerY.toFloat(), endRadius, Path.Direction.CW)
            }
            val translateAnimation = TranslateAnimation(
                Animation.RELATIVE_TO_SELF, 0f,
                Animation.RELATIVE_TO_SELF, 0f,
                Animation.RELATIVE_TO_SELF, 0f,
                Animation.RELATIVE_TO_SELF, -1.5f
            ).apply {
                duration = SPLASH_DURATION
                repeatCount = 0
                fillAfter = true
            }
            splashScreenView.iconView.startAnimation(translateAnimation)

            // 背景のReveal Animation
            splashScreenView.view.clipToOutline = true
            splashScreenView.view.outlineProvider = object : ViewOutlineProvider() {
                override fun getOutline(view: View?, outline: Outline?) {
                    view?.apply {
                        outline?.setPath(clipPath)
                    }
                }
            }
            ViewAnimationUtils.createCircularReveal(
                splashScreenView.view,
                splashScreenView.view.width / 2,
                0,
                screenHeight.toFloat(),
                screenHeight * 0.4f
            ).apply {
                duration = SPLASH_DURATION
                interpolator = AccelerateInterpolator()

                doOnEnd {
                    startMainActivity()
                }
            }.start()
        }
    }

    private fun startMainActivity() {
        startActivity(MainActivity.createIntent(this@SplashActivity))
        // ActivityのFadeAnimation
        // 34以上は遷移先のMainActivityで指定
        if (Build.VERSION.SDK_INT < Build.VERSION_CODES.UPSIDE_DOWN_CAKE) {
            overridePendingTransition(R.anim.fade_in, R.anim.fade_out)
        }
        finish()
    }
}
- 背景色の上書き
GIFに表示されているSplashの濃いピンクの部分が splashScreenView.view の部分で、薄いピンクの部分は window.decorView.setBackgroundColor で設定しているActivity自体の背景部分になっています。
ソースコード
を見るとわかりますが、結局はただのActivityの上にViewが乗っているだけなので、Activity自体の背景を塗りつぶしています。
window.decorView.setBackgroundColor(resources.getColor(R.color.background, null))
- アニメーション
アイコンとRevealのアニメーションは上に乗っているそれぞれのViewを愚直に操作しています。
ただのViewなので意外とそのまま動いてくれました✌️
半円のアニメーションは遷移先のActivity(Fragment)に画面サイズから作成した半円のViewを配置しているので、同じ位置になるように半径などを計算してアニメーションしています。
- 画面遷移
通常、Androidで画面遷移する場合はデフォルトのActivity遷移のアニメーションが入ってしまうため、スムーズな遷移に見せるために遷移アニメーションを上書きしています。
1点注意が必要で、overridePendingTransition はAPI34でDeprecatedになっているため、遷移先のMainActivityで overrideActivityTransition を設定しています。
Crash
この変更をリリースしたところ、GalaxyやAquosなどの一部端末でNullPointerExceptionが起きていました。
androidx.core.splashscreen.SplashScreenViewProvider$ViewImpl31.getIconView (SplashScreenViewProvider.kt:9)
そのためiconViewの取得はtry-catchしておいた方が良さそうです。
try {
    splashScreenView.iconView
} catch(e: NullPointerException) {
    // handle error
}
おまけ: Shape shifter
アイコンのAnimated Vector DrawableはShape Shifter で作成しました。
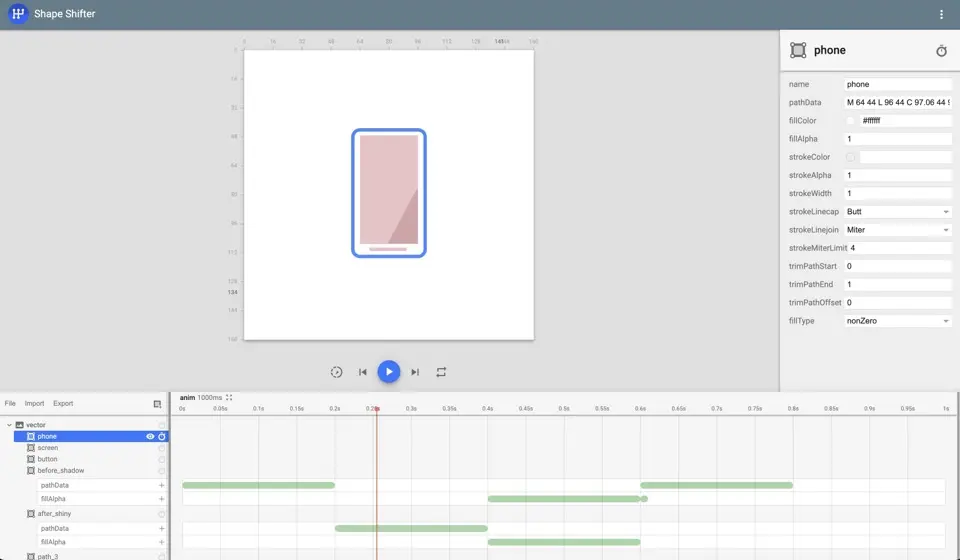
ShapeShifterで思い通りにアニメーションさせるにはパスの仕組みを把握する必要があります。
といってもシンプルな図形ならそこまで難しくはないです。
このアニメーションで使っている三角形を例に解説します。
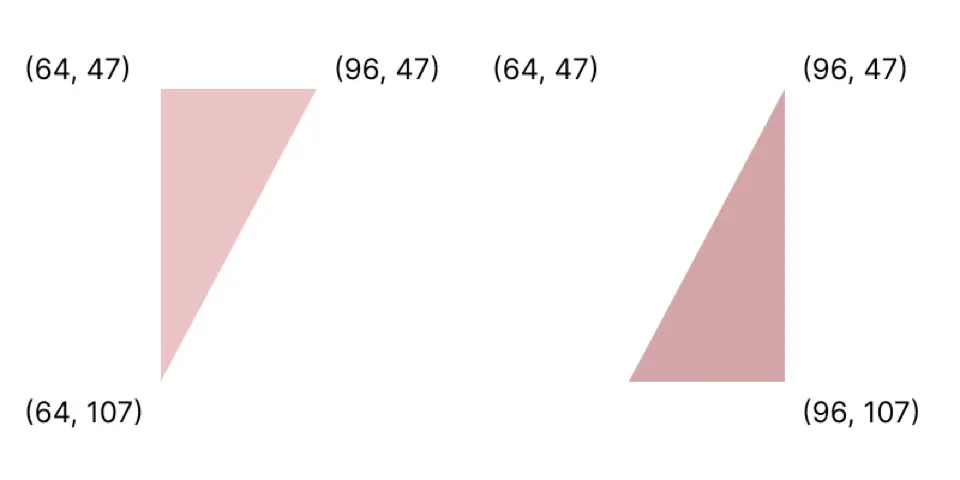
- 左側の三角形
M 64 47 L 96 47 L 64 107 L 64 47 Z
- 右側の三角形
M 64 107 L 96 47 L 96 47 L 64 107 Z
それぞれが座標になっていて
Mが始点となってZが終点になります。(正確にはZはMまで線を引いて閉じるの意)
Lの部分がコマンドとなっており、Lは直線を引きます。
他にはC,S,Q,Tで曲線を引いたり、Aで円弧を書けます。
ちなみにスマートフォンの形をした部分はこのようなパスになっています。 Cが入ると少し複雑に見えますが、分解してみると意外と人間でもSVGが読めます。
M 64 44 L 96 44 C 97.06 44 98.079 44.422 98.828 45.172 C 99.578 45.921 100 46.94 100 48 L 100 110 C 100 111.06 99.578 112.079 98.828 112.828 C 98.079 113.578 97.06 114 96 114 L 64 114 C 62.94 114 61.921 113.578 61.172 112.828 C 60.422 112.079 60 111.06 60 110 L 60 48 C 60 46.94 60.422 45.921 61.172 45.172 C 61.921 44.422 62.94 44 64 44
ShapeShifterで作成したアニメーションはこのようにSVGなどでも書き出せます。
まとめ
今更ではありますが、Android12から導入されたSplashをパワープレイ?でカスタマイズしてみました。
普段から色々なアプリを触っているのですが、こんな感じでカスタマイズされたSplashのアプリはほぼ見たことがないので、
余裕があるアプリはこだわってみると楽しいと思います。
(凝りすぎて起動時間を伸ばしすぎないようにしましょう)